Important: This is a legacy version of the documentation. Please visit the current documentation page.
Sell on another Amazon Marketplace
Sell on Another Marketplace is a useful feature for sellers who want to extend their business to other Amazon Marketplaces. If you are selling an item on one Amazon Marketplace and want to sell it on another Amazon Marketplace as well, you can do it more quickly and effectively with this feature.
How to start
To start selling items on another Marketplace, make sure that you have linked the appropriate Amazon account on the Marketplace to M2E Pro. To do it, go to Amazon Integration > Configuration > Accounts and click Add Account.
Note
To use the Sell on Another Marketplace feature properly, you must have at least two accounts added to M2E Pro.
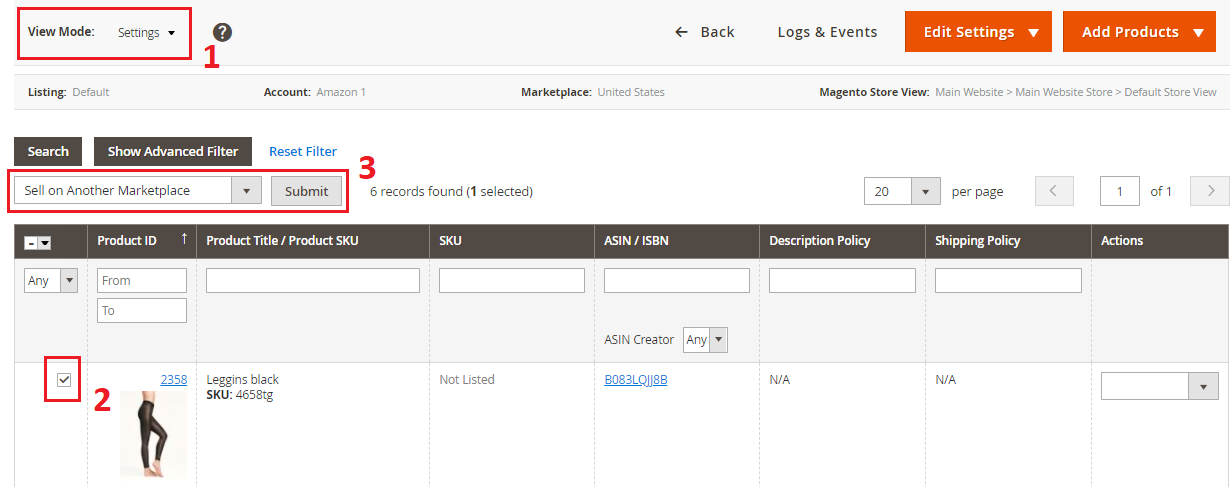
Then go to the existing M2E Pro Listing (Amazon Integration > Listings > M2E Pro) that contains the items you want to sell on another Marketplace. On top of the Listing grid, switch to Settings View Mode, select the items that you want to sell on another Amazon Marketplace, and submit Sell On Another Marketplace action from the mass Actions menu.
Let’s take a look at the terms we are going to use further in the article:
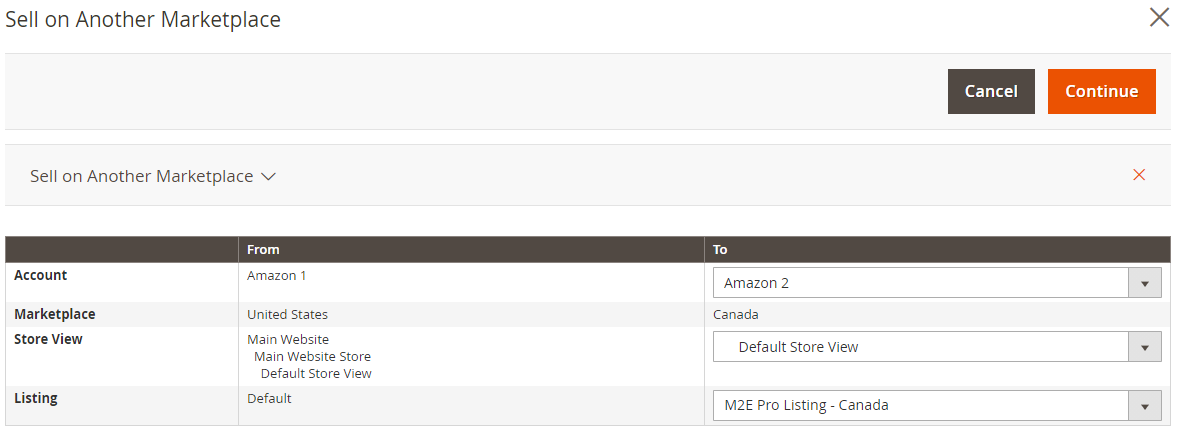
“From” Amazon Marketplace/Account/Listing - where the items and the related data are listed now.
“To” Amazon Marketplace/Account/Listing - where the items and the related data are going to be listed.
Step 1. Main Configurations
- Account. Select the Amazon account where you want to list your items.
- Marketplace. Select the Amazon Marketplace where you want to list your items.
- Store View. Select the Magento Store View where the Product data will be taken from.
- Listing. When Amazon account, Amazon Marketplace and Store View are selected, M2E Pro offers Listings with the same parameters (if they exist). You can either choose the existing Listing or create a new one.
Click Continue once you have configured all the options.
Note
If Items with the same Magento Product ID are already present in the “To” Listing, they will not be added again and M2E Pro will notify you.
You will find all the details in Logs.
Step 2. Setting Policies
If an existing Listing is selected, its Policies settings will be applied.
In case you select to create a new “To” Listing, you will see the Setting Policies step. There you can configure General, Selling and Search Policy Settings:
If necessary, you can always edit these settings within the Listing.
If a new Listing is created, and your “From” and “To” Marketplaces are the same:
M2E Pro will preserve all the Policy settings (Description, Shipping, Selling, Search, Synchronization, Tax Code) previously assigned to the “From” Listing. You can either keep these Policies or edit them later if necessary.
If a new Listing is created, and your “From” and “To” Marketplaces are different:
M2E Pro will preserve Search, Selling and Synchronization Policy settings previously assigned to the “From” Listing. You will have to configure new Description, Shipping and Tax Code Policy settings as they vary depending on the Marketplace.
Step 3. Final
The Items will be added to the newly created Listing or the existing Listing depending on the selected settings.
Now you can manage and list the Items on another Amazon Marketplace directly from this Listing.
Check out this video to see how the Sell on Another Amazon Marketplace feature works.


